New Project: Multiple Mes

Essential Question:  How can I tell a story with a digital collage in Adobe Photoshop?

Today we will introduce our next project, a Multiple Mes Photoshop Collage. We will photograph ourselves and our classmates, and then build a scene in Photoshop that tells a story using these photos. You will create your own background by combining images you have taken yourself with images you have found online.

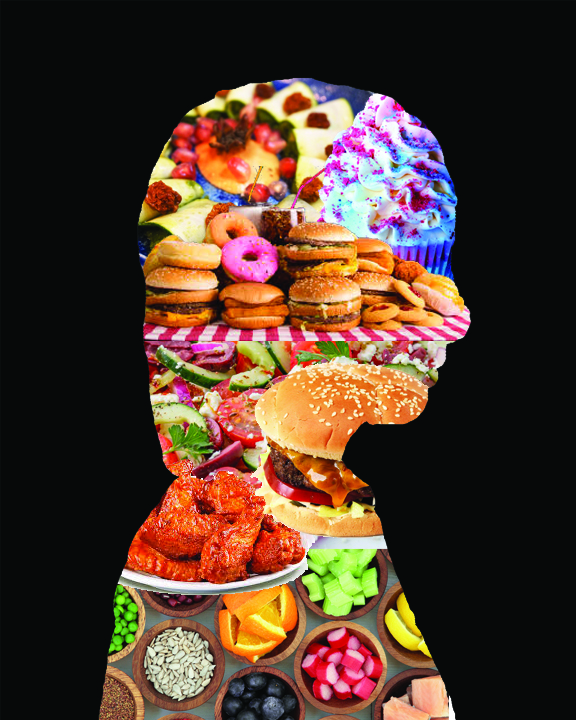
Here are some examples of past student work:

Project Requirements:

  • Created in Adobe Photoshop
  • Minimum size: 8×10″ @ 300 DPI
  • Original, realistic scene created from a minimum of ten images
    • Minimum of 3 clones photographed during class
    • Background created from a variety of images taken by student or downloaded from the internet (minimum 8MP). Any internet images must be noticeably modified to create your own unique scene.
    • Realistic background, middle ground, and foreground created through use of Photoshop layers
    • No copyrighted characters
  • High Quality Craftsmanship
    • No pixelation
    • Background cleanly removed
    • Images Photographed from appropriate angles
    • Lighting matches up
    • Scale and proportion makes sense
  • Final Blog post includes:
    • PNG of final image
    • 150 word Artist Statement

Today’s Assignment: Project Proposal Blog Post

Today we will publish our project proposals to our blogs.
Aleesa and Tianna have created great examples of what I am looking for.

Your Multiple Mes Project Proposal should contain the following:

  • Sketch (including the background/scene)
  • Paragraph describing your concept. Include the following:
    • Describe your concept
    • What will you photograph for your 3-6 green screen images?
    • What background or scene will you use?
    • What extra images or accessories will you add?
    • What costumes or props will you need to bring in next class for the green screen photography portion?
  • Any images you may use from the internet (background should be larger than 12MP, other images should be larger than 2MP). The Pexels website has thousands of great royalty-free photos.

Today we will:

  • Introduce the Multiple Mes project
  • Brainstorm concepts.
  • Create a new blog post with our project idea & sketch


Symbolic Silhouette Self-Portrait Day 6: Featured Artist: Guiseppe Arcimboldo

Today’s essential question: How can I write an artist statement about my work?

Today we will finish our symbolic silhouette self portraits. Then we will publish a final blog post with our finished artwork and an artist statement about our work.

Here are some great examples of final blog posts by previous 9th grade students:

Giuseppe Arcimboldo (1526 or 1527 – 1593)

Giuseppe Arcimboldo was an Italian painter best known for creating imaginative portrait heads made entirely of objects traditionally found in still life paintings (eg. fruits, vegetables, flowers, fish, and books). He painted these objects arranged in such a way that the whole collection of objects formed a recognizable likeness of the portrait subject. He often used objects that represented the subject he was painting, such as a librarian composed entirely of books.

Here are some examples of his work:


How is your project similar to Guiseppe Arcimboldo’s paintings? How is it different?

Today we will:

  • Finish our silhouette self portraits
  • upload both the Photoshop (.psd) and PNG files of our final projects to our Foundations 1 Google Drive Folders
  • create a new blog post with the following
    • a PNG of our finished project
    • a 150 word artist statement about our project. Not sure what to write? Start by answering the following questions:
      • Describe your artwork
        • What does your artwork look like?
        • What is the subject matter?
        • What art elements or principles are most obvious in your work?
      • How did you create your art?
        • What media is your artwork made from?
        • Describe the process or steps you took to create your artwork.
      • What is the big idea behind your artwork?
        • Who or what inspired your artwork?
        • What is your artwork about?
        • How do you want people to feel when they view your artwork?
      • Overall thoughts
        • What did you learn from creating this artwork?
        • Is the final piece what you imagined? How so?
        • What did you do well? What could you have done better?
      • Here are some great examples of final blog posts by previous 9th grade students:


Symbolic Silhouette Self-Portrait Day 5: Using a mask to fill in our background with an image

Today’s essential question: How can I create contrast between the inside of my silhouette and my background?

Today we will use the mask tool to fill in our background with an image.

Having trouble finding large enough images?

Sign up for a free account on the Pexels website and you’ll have access to thousands of great royalty-free photos.

Next class, we will critique our near-finished projects with a partner, and then spend the rest of the class period finishing our projects and making the changes suggested by the peer critique.

How to Use the Mask Tool

  1. Open your project Photoshop file (the one that ends with .psd, NOT .png).
  2. Open whatever image you would like to fill the negative space portion of your project.
  3. Drag whatever image you would like to fill the negative space portion of your project into the project Photoshop file.
    Screen Shot 2014-11-17 at 6.28.51 AM
  4. If it is the wrong orientation (such as my example where it is landscape instead of portrait), rotate the image.
    Edit -> Transform -> Rotate 90 CW (or CCW – your choice)
    Screen Shot 2014-11-17 at 6.29.01 AM
  5. Scale it so it fills the screen (Edit -> Free Transform). Remember to hold down the shift key and scale from the corner so you do not distort the proportions of the image. Also, do not make an image much larger – it will pixelate and look blurry when printed.
    Screen Shot 2014-11-17 at 6.41.29 AM
  6. In the layers palette on the bottom right side of the screen, click on the eye next to this layer to make it temporarily invisible.
    Screen Shot 2014-11-17 at 6.29.59 AM
  7. Click on the layer titled “negative space.” It should turn blue to show it has been selected.
    Screen Shot 2014-11-17 at 6.30.08 AM
  8. Your project should now look like this (you may have images inside your silhouette):
    Screen Shot 2014-11-17 at 6.30.46 AM
  9. Select the magic wand tool form the toolbar on the left side of the screen. magic_Wand
  10. Click on any part of the negative space layer that has been painted. It should now be outlined with dotted lines.
    selection_close_up
  11. In the layers palette on the bottom right side of the screen, click on the eye next to this layer to make it invisible.
    Screen Shot 2014-11-17 at 6.31.28 AMYour project should now look like this:
    Screen Shot 2014-11-17 at 6.33.00 AM
  12. Now click on the eye space next to the layer that contains the image you want to fill in your background. This will make the layer visible.
    Screen Shot 2014-11-17 at 6.33.13 AM
  13. Click on the layer itself to select it. It should turn blue.
    Screen Shot 2014-11-17 at 6.33.25 AM
  14. Click on the mask tool at the bottom of the layers palette. mask_tool
  15. This should hide everything but the background area:
    Screen Shot 2014-11-17 at 6.34.02 AM

Today we will:

  • Learn how to use the mask tool to fill in our background with an image
  • Continue working on our projects
  • Save our projects as both as (Photoshop) .psd and .png, upload both files to our school Google Drives, and create a new blog post with the PNG of our progress

Symbolic Silhouette Self-Portrait Day 4: Unity of Color

Today’s essential question: How can I create unity throughout my piece with color?

An artwork has unity when its different parts go together. One way to create unity is to repeat the same colors throughout a piece.

How have your classmates created unity in their silhouettes so far?

Why does this piece not feel unified, even though all of the photos show food?

food-mess.jpg

Need more images?

Create an account on the Pixabay website to get access to over a million free images.

Today we will:

  • Continuing removing the background from each image using the eraser or magic wand and saving the individual files as .PSDs
  • Continue dragging the images with the backgrounds removed into our silhouette file, making sure we are creating unity with common colors
  • Save our file as both a Photoshop and PNG
  • Upload both files to our Google Drive
  • Create a new blog post with the following:
    • PNG of our silhouette progress (no one will finish today)
    • a few sentences describing what was easy and what was difficult

Symbolic Silhouette Self-Portrait Day 3: Combining Multiple Images into One Photoshop File

Today’s essential question: How can I create unity throughout my project?

Today we will add the images we have downloaded to the inside of our Photoshop silhouettes. We will need to remove the background from each image.

We will learn how to add images to the background next class. Do not worry about that today.

Make sure your save your project as both a Photoshop (.PSD) file (which you will upload to your Google Drive) and a PNG file (which you will post to your blog). You blog will not let you upload a Photoshop file, and you will not be able to further edit a PNG file, which is why you need to save both versions. No one will finish their project today, but you must post your progress in order to receive participation points. No blog post = 0 participation for the day.

Downloading LARGE Images to Use in Your Project

  • Use the steps in this handout to download:
    • 15-20 images (that are larger than 4MP) you can use for the silhouette portion of our project
    • another 3-5 images (that are larger than 4MP) you might use for the background
  • Place these images in their own folder in your 890 number
  • Upload the folder to your Google Drive

Adding Images into your Silhouette

  1. Open your silhouette PHOTOSHOP file (the one that ends in .psd). Your layers palette should look like this:
    dragging_images_layers_screen_shot
    (If you only have one layer named background, you have mistakenly opened the PNG file. If that is the case, close  that file and open the .psd file.)
  2. Now open the first image you would like to drag into your silhouette in Photoshop.
    (File -> Open -> locate where you saved your image and select it)
    Go to the toolbar on the left side of the screen and select the move tool. move_tool
  3. Now click on the image and “throw” it into your silhouette Photoshop file. Your layers palette should now look like this:
    Screen Shot 2014-11-06 at 8.23.07 PM
  4. The image you just dragged should be below the negative space layer and on top of your silhouette layer. Eventually, it will look like the silhouette is filled with a collage of images:
    small_escher_profile_screen_Shot
  5. Scale or rotate the image by going to the top of the screen and selecting “Edit -> free transform. Do not make the image larger, or it will pixelate like the example below:
    pixelated_escher_Screen_shot
  6. Repeat steps until you have placed all your desired images into the silhouette photoshop file.
  7. Select the eraser tool and erase the background from each image. eraser_tool Make sure you are on the correct layer!
  8. Save your photoshop file occasionally while you are working on it so you do not lose your work (File -> save)

Saving your file & Posting to your blog

  1. Save your Photoshop File (File -> save)
  2. Save a version as a PNG (File -> save as -> Select “PNG” as “file type”).
  3. Upload the Photoshop file to your Google Drive
  4. Create a new blog post with the following:
    1. a png image of your progress. (You will not finish your project today, so I am looking for progress rather than perfection).
    2. a few sentences describing what was easy and what was difficult

Today we will:

  • Download 15-20 LARGE images we may want to use in our silhouettes
  • Begin dragging the images we downloaded that represent us into our silhouette file
  • Remove the background from each image using the eraser or magic wand
  • Save our file as both a Photoshop and PNG
  • Upload both files to our Google Drive
  • Create a new blog post with the following:
    • PNG of our silhouette progress (no one will finish today)
    • a few sentences describing what was easy and what was difficult

Save

Save

Symbolic Silhouette Self-Portrait: Day 2

Today’s essential question: How can I trace over my photo to create a silhouette in Photoshop?

Today we will begin creating our symbolic silhouette self-portrait in Photoshop. At the end of today’s class, we will save our progress as both a Photoshop (.psd) file and as a .png. We will place both files in our Foundations 1 Google Drive folders, and post the .png to our blogs in order to receive participation points.

Part 1: Saving and Opening the File in Photoshop

  1. Log into your school Gmail account. (Username: student # @rcsd121.org; Password: same password you use to log into the school computers.)
  2. Click on the squares in the top right corner of the screen and select Drive
    google_drive
  3. Right click your profile photo and select “Download”
  4. Open Photoshop.
  5. Open your photo on Photoshop. (File -> Open).

Part 2: Painting your silhouette

  1. Create a new layer by clicking on the new layer button at the bottom of the layers palette. new_layer_button
    It is located on the bottom right side on the screen.
    Name this layer “silhouette.” Make sure the silhouette layer is selected. You can tell it is selected if it is blue. Make sure you do this step, or you will paint over your face and forever alter your source photo!
    Your layers palette should now look like this:
    silhouette_layer_before_tracing
  2. Select the brush tool from the toolbar on the left of the screen. brush_tool Go to the top of the screen.
    Change the hardness to 100% by dragging the slider all the way to the right.
    brush_tool_slider
  3. Select a color to paint with by double-clicking on the color box on the bottom left side of the screen. color_selector
  4. Select the magnifying glass from the tool bar and click on your image until you have zoomed in enough to be able to trace over your silhouette. magnifying_glass
    If you accidentally zoom in too far, you can zoom back out by going to the menu at the top of the screen, and selecting (View -> Fit on screen).
  5. Select the brush tool again. brush_tool Begin tracing over your silhouette.
    Adjust the brush size as needed:
    Press the right bracket } key to make the brush larger
    Press the left bracket { key to make the brush smaller.
    Once your trace over your entire silhouette, your image should look like this:
    profile_silhouette
  6. Go to the menu at the top of the screen and press File -> Save to save your progress (or press control + S).

Part 3: Painting your background

  1. When you are finished, click on the Background layer in your layer palette, then press the new layer button to create a new layer. Name this layer “negative space.” Make sure the “negative space” layer is selected. You can tell it is selected if it is blue. Make sure you do this step, or you will forever alter your source photo! Your layers palette should now look like this:
    negative_space_before_bucket
  2. Select a color to paint with by double-clicking on the color box on the bottom left side of the screen. color_selector You should pick one that contrasts with your silhouette color.
  3. Select the paint bucket tool from the  toolbar on the left side of the screen.
    Click anywhere on your image to paint the background.
    Your image should now look like this:
    profile_silhouette_bg
  4. Go to the menu at the top of the screen and press File -> Save to save your progress (or press control + S).

Part 4: Cutting the silhouette out of the background

  1. Click on the silhouette layer. Go to the menu at the top of the screen and select Layer -> Duplicate layer. Name this layer “silhouette copy.”
  2. Click on the original silhouette layer in the layers palette so it turns blue.
    The layers palette should now look like this:
    layers_silhouette_copy
  3. Go to the menu at the top of the screen and select Layer -> Merge down. This will merge one of the silhouette layers with your negative space layer. Click on this merged layer to select it. It should be blue.
    The layers palette should now look like this:
    merged_layers
  4. Click on the magic wand tool. magic_wand
    It may be hidden under the quick selection tool. If that is the case, click and hold this quick selection tool until the magic wand tool appears, then select the magic wand tool. magic_wand_quick_selection
    At the top of the screen, change the tolerance to 10.
    magic_wand_settings
  5. Click the silhouette to select it. Then press control + x to remove the silhouette.
    It will not look like anything has happened. To test whether you have actually deleted the silhouette from the inside of the merged layer, go to the layers palette and click on the eye next to the silhouette layer. This will make the silhouette layer invisible, and you will be able to see what remains on the merged “negative space” layer:
    eyeball_layers
    Your silhouette should be cut out of the background like this:
    profile_bg_only
  6. Go to the layers palette. Drag the “negative space layer” to the top of the screen, and click the eyeball next to the “silhouette copy” layer to make it visible again.
    Your layers palette should now look like this:
    eyeball_layers_visible

Part 5: Saving your file

  1. Go to the menu at the top of the screen.
  2. Select File -> Save to save your final Photoshop file (or press control + S).
  3. Then select File -> Save as -> and save your file as a PNG.

Today we will:

  • Trace over the photos to create silhouettes of ourselves. You can access this photo through your school Google Drive.
  • Save our file as both a Photoshop (.psd) and .png.
  • Upload both our .psd and .png files to our Google Drive accounts
  • Create a new blog post with the following:
    • the png of our silhouette

New Project: Symbolic Silhouette Self-Portrait

Part 1: Sharing our favorite artwork with the class

Part 2: Starting our symbolic silhouette self-portrait

Today’s essential question: What are some images that might represent your interests or personality?

Today we will plan our silhouette self-portrait collage. We will create a new blog post with our concept and any images we may use, both for the inside of the silhouette and for the background.

Here are some examples of what I am looking for:

Here are some sample projects created by past 9th grade students:

Project Requirements:

  • collage created in Photoshop from at least 10 different images (the more, the better)
  • contrast between silhouette & background
  • no copyrighted characters or trademarked logos
  • unity throughout the piece
  • mastery of layers, paintbrush, and eraser tool in Photoshop demonstrated through high quality craftsmanship

Downloading LARGE Images to Use in Your Project

  • Use the steps in this handout to download:
    • 15-20 images (that are larger than 2MP) you can use for the silhouette portion of our project
    • another 3-5 images (that are larger than 8MP) you might use for the background
  • Place these images in their own folder on your desktop
  • Upload the folder to your Google Drive
  • Create a new blog post with the following:
    • any LARGE images you may use in your project (download at least 20)
    • a few sentences describing the types of images you plan to use, and why each of these images is significant or meaningful to you
    • follow the format of the students examples listed at the top of this blog post

Today we will:

  • Download LARGE images to be used in our project.
  • Upload all the images to our Foundations 1 Google Drive folders. Create a new subfolder within this folder called “Symbolic Silhouette Self-Portrait” and store the images in this new folder.
  • Create a new blog post with the following:
    • any LARGE images you may use in your project (download at least 20)
    • a few sentences describing the types of images you plan to use, and why each of these images is significant or meaningful to you
  • Finish any missing/incomplete assignments and post them to our blogs

Save

Dress Up Kitten Tutorial

Today’s essential question: How can I create a collage in Adobe Photoshop?

Today we will learn how to create a collage in Photoshop by completing a tutorial. We will upload both Photoshop (.psd)  and .PNG versions of our file to our Google Drives, and post a PNG (.png) of the completed tutorial to our class blogs.

If you feel like you understand Photoshop well, consider becoming a student leader and help teach your classmates how to do the mini lesson. (Notice that I said teach, not do their projects for them!)

Once you finish the kitten tutorial, you may go back and finish the veggie photoshop project if you did not finish it last class.

Dress Up Kitten Tutorial

Kitten Dress Up Tutorial (teaches us how to combine multiple images into one Photoshop file, and how to use the transform tool to scale and rotate objects)

Completed kitten dress up tutorial

  • Click here to view the step-by-step-instructions for the kitten dress up Photoshop tutorial. (If you do not have this file open and cannot tell me what step you need help with, I will not help you.)
  • Click here to download the kitten dress up Photoshop file.
  • Once you get comfortable with Photoshop, feel free to download extra accessories from Google images and customize your fashionable kitten! See if you can figure out how to add a background. Here are some examples of students who have gone above and beyond with the dress up kitten assignment:

Today we will:

  • Complete the kitten dress up tutorial
  • Upload both our finished Photoshop and PNG files to our Google Drives
  • Post a PNG of the completed tutorial to our class blog. You must post your work to your blog in order to receive participation points for today’s class.
  • Finish the veggie tutorial and post it to our blogs (if you have not done so already)

Removing Backgrounds in Photoshop

Today’s essential questions: How can I use Photoshop to remove the background of an image?

Today we will learn how to remove the background of an image in Photoshop by completing a tutorial.

If you feel like you understand Photoshop well, consider becoming a student leader and help teach your classmates how to do the tutorial. (Notice that I said teach, not do their projects for them!)

We will save a Photoshop (.psd) version of our file to our 890# AND our Google Drives, and post a PNG (.png) of each completed tutorial to our class blogs.

What is the difference between a .psd and .png?

A Photoshop (.psd) file contains layers and can be edited. You need Photoshop to be able to open it, so you cannot upload this format to your blog.

A PNG (.png) file has been flattened into one layer. It can no longer be edited because of this, but can be viewed without Photoshop, so you can upload this format to your blog.

Why is it important to save your image as both file types?

Veggie Tutorial

Veggie Tutorial (teaches us how to use a variety of tools to remove the background from an image)

Veggie tutorial starter file

Completed veggie tutorial

In order for it to be considered complete, it must meet the following requirements:

  • the background needs to be removed from the tomato, broccoli, onion, and mushroom
  • you must have duplicated at least one of the vegetables
  • you must have transformed the copy of the vegetable you duplicated by scaling and rotating it
  • you must add a shadow to at least one of the vegetables

Click here to view the step-by-step instructions for the veggie Photoshop tutorial. (If you do not have this file open and cannot tell me what step you need help with, I will not help you.)

Click here to download the veggie Photoshop starter file.

Need help? Please follow the following process:

  1. Check the blog
  2. Ask two classmates
  3. Still stuck? Raise your hand and Ms. Lawson will help you as soon as she is available.

Today we will:

  • Learn how to remove the background of an image in Photoshop by completing the veggie tutorial
  • Create a new blog post with an image of the completed veggie tutorial
  • Upload both the .PSD and .PNG files of our completed veggie tutorials to our shared Foundations 1 Google Drive folders

Google Drive & Setting Up Blogs

Today’s essential questions: How can I upload my digital art to a shared Google Drive folder? What do I need to do to finish setting up my class blog?

Part 1: Sharing our Favorite Artwork with the Class

Part 2: How to Create a Shared Folder in Google Drive

  1. Log into your school Gmail account. (Username: student # @rcsd121.org; Password: same password you use to log into the school computers.)
  2. Click on the squares in the top right corner of the screen and select Drive
    google_drive
  3. Click on “New” on the top left side of the screen and then “Folder” from the drop down menu to create a new folder
    new_folder
  4. Name your folder “LastName_FirstInitial_Foundations1”
    new_folder_name
  5. Right click on the folder and select “Share.”
    share_folder
  6. Share the folder with me and make sure you give me permission to add items.
    folder_permissions

Part 3: Finishing Setting Up Our Blogs

Congratulations to the following people who have properly set up their blogs and published their first blog post: Daneisha, Song’er, Jeanelly, Isaiah, Hakim, Mara

The following people need to email me the links to their blogs: Jawanzaa, Asher, Darnell, Tyree

Everyone else should log into their email and click on the email from WordPress to verify their email address. They should then log into their wordpress account to make sure they have hit “publish” on their first blog post.

Need help? Please follow the following process:

  1. Check the blog
  2. Ask two classmates
  3. Still stuck? Raise your hand and Ms. Lawson will help you as soon as she is available.

Today we will:

  • Share our favorite artwork with the class
  • Create a Foundations1 folder in your school Google Drive and share it with Ms. Lawson
  • Finish setting up our class  blogs