New Project: 1 Pt Perspective Room Design

Today’s essential question: How can I design an interesting interior space?

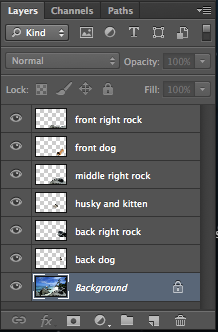
Interior Design Project

Today we will begin our interior design project. We will research various interior design styles and create a new blog post with a “mood board” of the look we hope to achieve.

We will start with the blank room template below and turn it into an interior space of our choosing. You may want to consider, but are not limited to, spaces such as a dream bedroom or dorm room, an art studio, a coffee shop or restaurant, a music venue, or a store.

Blank room template:
empty-room-source-file

I have purposefully not provided the high-res version of the room template today to force you to spend all class on your project planning post. No one should be working in Photoshop today!

Here are some examples created by past SOTA students:

Project Requirements:

  • Created in Adobe Photoshop from the provided blank room template
  • Includes a minimum of 10 different images
  • Floor and walls have been covered with texture or altered in color
  • Contains a light source (lamp, fireplace, windows, etc)
  • Follows one point perspective
  • All objects in the room go together to create a cohesive style
  • High Quality Craftsmanship
    • No pixelation
    • Background cleanly removed
    • Images photographed from appropriate angles
    • Lighting matches up
    • Scale and proportion makes sense
  • Final Blog post includes:
    • PNG of final image
    • 150 word Artist Statement

Today we will

  • Research potential interior design styles we may use in our project
  • Create a new blog post with the following (use Giacomo’s post as a guide):
    • A minimum of 20 images we may use in our room design project. Make sure these images are large enough not to look pixelated! These images should cover the following things:
      • lighting
      • furniture
      • architectural details (stairs, pillars, molding, wall and ceiling textures)
      • floor materials and coverings
      • windows and window coverings
      • art and accessories
      • intended color scheme/style
      • Remember, you are starting with the plain image at the top of the blog post, so you will have to add every detail in the room yourself.
    • A paragraph describing the intended purpose of the room, the style you are trying to create, and how the items you have posted will contribute to the room

Multiple Mes – Last Day

cat_clonesToday we will finish our Multiple Mes project. We will  upload our final Photoshop (.psd) and PNG files to our Foundations 1 Google Drive Folders. We will then make a blog post with a PNG of our final image and an artist statement (minimum of 150 words and written in paragraph form) about our project.

Please make sure you have placed your final PSDs and PNGs in your Shared Foundations 1 Google Drive Folder. This is the only way I can access the print-resolution file.

Here are some examples of what I am looking for in a final blog post:

Here are some of the strongest projects from this class

What makes them successful?

Today we will:

  • Finish our Multiple Mes Photoshop Collage
  • upload both the Photoshop (.psd) and PNG files of our final projects to our Foundations 1 Google Drive Folders
  • Create a new blog post with the following:
    • A PNG of our finished project
    • A 150 word artist statement about our project.
      Not sure what to write? Start by answering the following questions:

      • Describe your artwork
        • What does your artwork look like?
        • What is the subject matter?
        • What art elements or principles are most obvious in your work?
      • How did you create your art?
        • What media is your artwork made from?
        • Describe the process or steps you took to create your artwork.
      • What is the big idea behind your artwork?
        • Who or what inspired your artwork?
        • What is your artwork about?
        • How do you want people to feel when they view your artwork?
      • Overall thoughts
        • What did you learn from creating this artwork?
        • Is the final piece what you imagined? How so?
        • What did you do well? What could you have done better?

Multiple Mes In Process Critique

critique-meter-with-different-emotions.jpg

Today’s essential question: What can I add or change about my project to make sure it fulfills all requirements?

Today we will critique our Multiple Mes projects so far with assigned groups. You will check to see how well the project follows each of the guidelines listed below, and answer the questions below about the feedback you received on YOUR project in a new blog post.

In Process Critique Questions:

  • Is the project an original, realistic scene created from a minimum of ten images? What needs to be added or changed?
    • Minimum of 3 clones photographed during class
    • Background created from a variety of images
    • Realistic background, middle ground, and foreground created through use of Photoshop layers (ie there must be overlap)
    • No copyrighted characters
  • How would you describe the craftsmanship on the project? What could be improved?
    • No pixelation
    • Background cleanly removed
    • Images Photographed from appropriate angles
    • Lighting matches up
    • Scale and proportion makes sense

Groups:

  • Beatrix, Asher, Nicky, Jeanelly
  • Son’ger, Tyree, Lamya
  • Daneisha, Alexis, Alicia, Mara
  • Isaiah, Isaias, Hakim, Arleigh
  • Darnell, Antonio

Today we will:

  • Critique our Multiple Mes projects so far with 1-2 classmates. Write the feedback in a new blog post. You will reference this feedback as you continue to work on your Multiple Mes project.
  • Continue working on our Multiple Mes projects, incorporating any feedback we received during today’s in progress critique
  • Upload both the PSD and PNG of our progress to our Google Drives
  • Create a new blog post with the following:
    • a PNG of our progress
    • the feedback you received during today’s peer critique
    • what you worked on during today’s class, and what you still need to do to finish your project

Multiple Mes Day 6: Lighting with Filters, Dodge, and Burn

Today’s essential question: How can I use filters and the dodge and burn tools to match the lighting throughout my Photoshop collage?

Thursday will be our last class on this project. By this point, you should have started combining your images in Photoshop to create a scene. The lighting likely differs throughout, making it obvious that the scene was created from several different images. Today we will learn how to create the illusion of cohesive lighting through filters and the dodge and burn tools.

Adjusting Color with Photo Filters

For an image to look cohesive, the lighting needs to be consistent throughout. The image below was clearly Photoshopped because Mckenzie is not as blue as the background:
blue_woods_no_filter

We can change that by using Photo filters.

  1. First, select the layer with Mckenzie on it in the layers palette on the bottom right hand side of the screen. At the top of the screen, go to Image -> Adjustments -> Photo Filter
    image_adjustments_photo_filter
  2. We can then select different photo filters from the drop down menu, and preview them to see which one is the best fit. Similarly, we can also preview the intensity of the filter by adjusting the slider. For this particular image, the Cyan filter at 40% seems to create the most realistic effect:
    cyan_filter
    blue_woods_filter

Now let’s see if we can create a similarly realistic effect with a warmer background. Once again, notice how the original photo looks awkward when first placed in the scene:
orange_fire_no_filters

  1. Once again, we will select the layer with Mckenzie on it in the layers palette on the bottom right hand side of the screen. At the top of the screen, go to Image -> Adjustments -> Photo Filter. This time, the Warming Filter (85) at 60% seems to create the most realistic effect:
    warming_filter
    orange_fire_filters

Establishing a Clear Light Source with the Dodge and Burn Tools

Photo filters match the colors of each piece of the photo collage, but for a truly unified image, we will need to establish a clear light source. This is where the dodge and burn tools come in. They will allow us to add highlights (dodge tool) and shadows (burn tool) in a similar manner to traditional drawing.

In the image with Mckenzie, the fire is a natural light source. Therefore, we will want to darken the left side of Mckenzie, the bottom portion of Mckenzie, the ground area around Mckenzie and the fire, and the bottom portion of the logs.

  1. First, we will select the burn tool burn_tool from the tool bar on the left side of the screen.
  2. Next we will adjust the settings at the top of the screen. It works best if you set the exposure of the burn tool low, and darken your desired area slowly. This is how I have set my burn tool:
    burn_tool_settings
  3. Now select your desired layer in the layers palette on the lower right side of the screen. I always duplicate the layer (Layer -> duplicate layer) before dodging or burning it, so I can go back to the original layer if I mess up.
  4. Paint your desired area with the burn tool. You can adjust the size of the brush at the top of the screen, or by using the right and left brackets. Slowly shade the areas you want to darken just as you would with a pencil. You will have to select each layer in the layers palette on the lower right side of the screen before you can use the burn tool on any objects in that layer. Notice how we have now created a clear light source by painting shadows with the burn tool:
    orange_fire_filters_burn_tool
  5. If you would like to highlight any parts of the image, click and hold on the burn tool in the tool bar on the left side of the screen. The dodge tool dodge_tool should appear in a drop down menu below it. Select the dodge tool, adjust the setting at the top of the screen so the exposure is set to 15-25%, and paint as needed to create highlights.

Here is a side by side comparison of the original collage, as well as the collage after we have applied photo filters and the burn tool:

Be careful not to go overboard with the dodge and burn tools:
intense_burn_tool

Today we will:

  • Continue building our scenes in Photoshop
  • Create cohesive lighting using photo filters, dodge, and burn
  • Create a new blog post with the following:
    • An image of your progress so far
    • A few sentences describing any challenges you faced today, how you worked through those challenges, and what you would like help with

Multiple Mes Day 5: Using layers to create a realistic scene

Today’s essential question: How can I use layers to create a realistic scene with a foreground, middle ground, and background in Photoshop?

I created this photo of puppies on vacation with many layers in Photoshop:
beach_layers

Here is what the layers palette looks like:
layers_palette

Here is a step by step process for building the scene with layers:

1_beach_layers

2_beach_layers

3_beach_layers

4_beach_layers

5_beach_layers

beach_layers

Using foreground, middle ground, and background will help your characters look like they are actually in the scene, versus on top of an existing image. How will you use layers in Photoshop to create a realistic environment? What are some things you could add to your foreground?

Today we will:

  • Continue building our scenes in Photoshop
  • Upload our progress to our shared Foundations 1 folders in Google Drive
  • Create a new blog post with the following:
    • PNG images of anything you worked on today
    • a few sentences describing what you found easy, as well as any challenges or things you would like extra help with

Multiple Mes Day 4: Combining images to build a unique setting

Today’s essential question: How can I combine images to build a unique setting for my story?

Today we will remove backgrounds from images we will use in our digital collage. If you have taken your green screen photos, you should remove the backgrounds from them. Otherwise, you will download pieces of your scene and remove the backgrounds from the various pieces that will comprise your setting.

If you have not yet taken the photos of yourself or your classmates for this project, please do so this class.

Creating a setting

You must photoshop at least 5 different images together for your background or setting.  (So, for example, you cannot just put the images you photographed in front of the green screen into an existing photograph – you must add at least 2, preferably more, other items to customize your scene.) The emptier the scene you start with, the better. For example, the image below is terrible for the purposes of the project, because it is already full of cars and people, so we have no room to add our own:

1f2d7a02-dd5c-45e9-84fe-b98e76377bf1

The next image is much better, because it has space to add whatever cars or people we would like, giving us complete control over the mood we establish:

dennys_restaurant_at_the_elko_junction_shopping_center_in_elko_nevada_cropped.jpg

Here is another example. These wooded scenes are all a great place to start because they have ample space in the foreground to add other imagery:

Here are some extra images that might make the scene more interesting:


Today we will:

  • Continue working on our Multiple Mes project
  • Publish a new blog post with the work completed today
  • Upload our work to our Google Drives

Multiple Mes Day 3: Common Multiple Mes Photography Mistakes

Today’s essential question: What are some common issues that arise when taking photos for the multiple mes project? How can we prevent them?

Today we will continue photographing ourselves, trying to prevent common photography mistakes. We will post any photos we have taken today to our class blogs, and will also upload them to our shared Google Drive folders.

If you have already taken your photos, you may begin removing the backgrounds using either the Procreate app on the iPads or Photoshop on the computers. You must have uploaded your photos to your Google Drive for this to work, and you must upload the photos to your Google Drive again after you have removed the backgrounds.

Here are some examples of what I am looking for in today’s blog posts:

Common Multiple Mes Photography Mistakes

Camera angles do not match
camera_angle

Why it happens: Different photos are taken from different camera angles. These photos then will not work together if composited into the same image in Photoshop.

How to prevent it: Set up a tripod to your desired height and camera angle, and keep it consistent as you photograph all of your subjects. Make sure the angle of the camera matches the angle of your background scene.

Motion Blur
motion_blur

Why it happens: The subject moves before the camera finishes taking the photo.

How to prevent it: Use a quick shutter speed (if you have a DSLR). If you can’t control the shutter speed manually, force the camera to use a quick shutter speed by providing sufficient light and using a tripod to steady the camera. Remind your model to remain as still as possible.

Subject is not Realistically Posed
zombiefilming2

darla-cropped.png

Why it happens: The model awkwardly acts out a pose without the necessary props, and consequently, poses themselves incorrectly. When the scene and props are later added in Photoshop, they do not fit or look strange.

How to prevent it: Provide the model with placeholder props and scenery that mimic the size and shape of whatever will be added in Photoshop. It’s amazing how much simple objects such as boxes, paper towel rolls, rope, and stuffed animals can help the model pose properly.

Bonus Tip: Place Green Screen on Ground to Easily Capture Action Shots
green_screen_on_ground.jpg

Today we will:

  • Take photos in the hallway for our Multiple Mes project
  • Upload any photos taken today to our shared class folders in our Google Drive
  • Remove the backgrounds using either the Procreate app on the iPads or Photoshop on the computers
  • Create a new  blog post with the following:
    • images of any work created today
    • a brief reflection of any challenges you faced, how you worked through those challenges, and what you would like help with

Multiple Mes Day 2: Featured Artist Tim Burton

Today’s essential question: How can I pose in front of a green screen to create interactive clones in my final project?

Today we will look at how director Tim Burton utilized green screen technology for his 2010 production of Alice In Wonderland. We will then finish our project proposals.

What are some connections between Tim Burton’s work and our Multiple Mes Project?

Here are some stills from Alice in Wonderland:

And here are some images depicting what was actually filmed in front of a green screen:

What surprises you? What ideas have these behind-the-scenes images given you for your own project?

Want to learn more? This article covers Tim Burton’s utilization of a green screen and other special effects.

Incomplete Assignments (please finish before Multiple Mes):

  • Darnell (Silhouette Self-Portrait, Artist Statement)
  • Antonio (Silhouette Self-Portrait, Artist Statement)
  • Lamya (Silhouette Self-Portrait, Artist Statement)
  • Arleigh (Silhouette Self-Portrait, Artist Statement)
  • Tyree (Silhouette Self-Portrait needs more images – minimum 10 images)
  • Isaias (Silhouette Self-Portrait, Artist Statement)
  • Alicia (Silhouette Self-Portrait, Artist Statement)
  • Isaiah (Silhouette Self-Portrait, Artist Statement)
  • Jessie (Silhouette Self-Portrait, Artist Statement)

Today we will:

  • Discuss the work of Tim Burton and how it applies to our Multiple Mes project
  • Begin shooting green screen photos (if we finished our project proposals – Asher is the only one who is ready to take photos)
  • Upload any photos taken today to our shared class folders in Google Drive
  • Finish our Multiple Mes project proposals (if we have not done so already)
  • Publish today’s work to our blogs. No blog post = 0 participation!