Last Day of the Course

dog_graduationThis is the last day of the course. Please finish any missing/incomplete assignments and post them to your blog.

Missing/Incomplete Assignments:

  • Antonio – 4 celebrity prints, celebrity artist statement
  • Lamya – 4 celebrity prints, celebrity artist statement
  • Arleigh – celebrity artist statement
  • Nicky – celebrity artist statement
  • Isaias – stop motion animation & artist statement
  • Alicia – 4 celebrity prints, celebrity artist statement
  • Alexis – 4 celebrity prints, celebrity artist statement
  • Isaiah – stop motion animation & artist statement
  • Hakim – 4 celebrity prints, celebrity artist statement
  • Jesse – 4 celebrity prints, celebrity artist statement
  • Mara – 4 celebrity prints, celebrity artist statement

Optional survey (copy and paste questions in a new blog post):

  • What was your favorite project(s) this semester? Why?
  • Were there any projects you did not like? Which ones? What did you not like about them?
  • What types of (digital art) projects would you like to see more of?

Today we will:

  • Finish any incomplete projects and post them to the blog along with artist statements
  • Make sure all finished projects are in the Google Drive folder you have shared with Ms. Lawson
  • Complete the survey in a new blog post (optional)

Pop Art Celebrity Prints Day 4: Featured Artist: Andy Warhol

If you have not already done so, please make sure the Photoshop files of your room designs, and any celebrity prints that you have finished, are shared with Ms. Lawson in Google Drive.

Today’s essential question: What are some ways our celebrity prints are similar to the artwork of Andy Warhol? What are some ways they are different?

Today we will discuss the artwork of Andy Warhol and then continue working on our celebrity prints. If you think you have your set of 4 final coordinating prints, call Ms. Lawson over for feedback. Once she approved your set, you can create a final blog post with all 4 prints and a 150-word artist statement about the project.

Andy-Warhol-Photograph-C10036912.jpgAndy Warhol was an American artist who was a leading figure in the visual art movement known as pop art, or the art of popular culture. His works explore the relationship between artistic expression, celebrity culture, and advertising. By the 1960s, Warhol ran a studio known as “The Factory,” where he collaborated with dozens of assistants and celebrities, eventually becoming a celebrity himself. Learn more about Andy Warhol from the Warhol Foundation.

Here is a 1 minute video of Andy Warhol making a print. Do you think his assistant should have received credit? Why or why not?

Why do you think Andy Warhol focused on printmaking instead of drawing or painting?

Do you think Andy Warhol would have used Photoshop if he were alive today? Why or why not?

Here are some of Andy Warhol’s prints:

Artist Statement Brainstorming Questions:

  • Describe your artwork
    • What does your artwork look like?
    • What is the subject matter?
    • What art elements (ex. color, value, shape, line, texture, form) or principles are most obvious in your work?
  • How did you create your art?
    • What media is your artwork made from?
    • Describe the process or steps you took to create your artwork.
  • What is the big idea behind your artwork?
    • Who or what inspired your artwork?
    • What is your artwork about?
    • How do you want people to feel when they view your artwork?
  • Overall thoughts
    • What did you learn from creating this artwork?
    • Is the final piece what you imagined? How so?
    • What did you do well? What could you have done better?

Today we will:

  • Learn about Andy Warhol and discuss his prints
  • Continue working on our celebrity prints
  • Create a new blog post with the following:
    • If you have not finished the project, you will post an image of anything you worked on today
    • If your finished your project, you will post:
      • a set of your 4 favorite PNG or JPGs of your celebrity that you created in Photoshop
      • a 150 word artist statement about the project

Pop Art Celebrity Prints Day 3: Creating a Unified Set of Four Prints

This is the last week of the semester (and the course). Please plan your time accordingly and arrange to come in during lunches and advisements as needed.

Student Teacher – Ms. Manhardt

We have a student teacher, Ms. Manhardt, joining us from RIT. You can learn more about Ms. Manhardt, and see examples of her artwork on her class blog.

Today’s Essential Question: How will you tie your favorite 4 prints together so they read as one unified artwork?

Today we will continue making celebrity prints in different color schemes. Aim for 8-10 prints total. This will give you the most options to pick from, ensuring that your set of four prints will display unity. Here are some examples of print sets that work well together created by past students. What are some reasons each of these sets goes together?

Remember, the design seeds website is a great resource for color schemes.

By the end of today’s class, make sure the following have been posted to your blog AND your shared Google Drive folder:

  • The grayscale cutout image of your celebrity
  • Every version of your celebrity that you have created. You will not like every image, and that is ok. The point of this project is to experiment with different color schemes that push the boundaries of our comfort zone.

Today we will:

  • continue making celebrity prints in different color schemes
  • Post all the prints (including the original black and white one) to our blogs
  • Upload all of our prints to our shared Google Drive folders

Pop Art Celebrity Prints Day 2: Adding Color

open_studio

Open Studio Hours

This room will have Open Studio hours next week at the following times:

  • Tuesday, 1/21 from 7:30-10:30am
  • Thursday, 1/23 from 7:30-10:30am

The following projects count towards 2nd marking period:

  • Room Design
  • Stop Motion Animation
  • Set Of 4 Celebrity Prints

Today’s essential question: How can I add color to my celebrity portrait?

Today we will finish smoothing out our celebrity portraits. You will show your finished design to Ms. Lawson, and once she approves it, you will post a PNG of your smoothed out portrait to your blog, and upload the black and white smoothed out image to your shared Foundations 1 Google Drive folder.

Then you will begin adding color to your celebrity portrait, following the steps in this post. You will save each color scheme as a different file name. (ex. arianna_grande_blue, arianna_grande_purple_orange, etc).

A Monochromatic Color Scheme is comprised of different tints and shades of one color.
monochromatic

The design seeds website is a great resource for color schemes.
I used several of their color schemes for my Drake prints:

PolarHues   drake_polar_hues MineralPalette2   drake_mineral_palette

How to Add Color to your Photoshop Portrait

  1. Open Photoshop (Go to the windows icon at the bottom left of the screen -> All Programs -> Adobe Master Collection CS5 -> Adobe Photoshop).
  2. Open the Photoshop file of your monochromatic celebrity portrait (File -> Open).
  3. Convert the Image to CMYK. This will allow you to add color. (Image -> Mode -> CMYK). If will ask if you want to flatten the image by merging the layers. Say yes.
  4. Open the image of the color scheme you want to use. Select the move tool. move_tool Use it to drag your color scheme into your photoshop file. Double click on the layer with the color scheme, and name it “color scheme.”
  5. Save a version of this file that recognizes that you can add color (File -> Save as -> filename_red_monochromatic.psd)
  6. Select the eyedropper tool. eyedropper Use it to select your first color. (It is easiest to start with the darkest or lightest color, and get progressively darker or lighter.)
  7. Click on the layer with your image.
  8. Select the magic wand tool. magic_wand Use it to select your first color.
  9. At the top of the screen, click Select -> Select Similar. This will select all the areas of that color.
  10. Make a new layer.
  11. Select the brush tool. brush_tool 
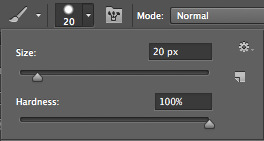
Make sure it is set to 100% hardness. Make the brush size huge by clicking holding down on the right bracket (}) key. Color over your entire image. Only the selected areas should change color.
  12. Select -> Deselect
  13. Repeat steps for your next color.
  14. Repeat steps until you have added all the colors.
  15. Save your photoshop file. File -> Save).
  16. Save your file as a jpg file. File -> Save As -> filename_red_monochomatic.jpg (or some other name that identifies your color scheme).
  17. Close your file.
  18. Repeat these steps to create more prints in different color schemes.

Today we will:

  • Demonstrate how to add color in Photoshop and save different versions for each color scheme
  • Create several variations of our portrait using different color schemes
  • Create a new blog post with the following:
    • our black and white celebrity print
    • each digital version and the color scheme it was inspired by

New Project: Pop Art Celebrity Prints

Today’s essential question: What celebrity will you use for your portrait project? Why?

Project requirements:

  • one black and white high contrast portrait with 4-6 shades
    drake_cut_paper_edited
  • a set of four coordinating Photoshop portraits of that celebrity featuring a range of different color schemes
    drake_photoshop_exemplar

How to Create your cropped, monochromatic high-contrast celebrity portrait

  1. Download your celebrity image
    1. Go to images.google.com and search for a LARGE image of your celebrity
    2. Click on the image of your choice until you can view it full size. Then right click -> save image as and REMEMBER WHERE YOU SAVED THE IMAGE
  2. Open your celebrity photo in Photoshop
    1. Open Photoshop
  3. File -> Open (Select the image you downloaded. You will need to remember where you saved it!)
    drake-wallpaper-hd
  4. Turn the image black & white. (Image -> Mode -> Grayscale).
  5. Crop your image.
    1. Select the crop tool.
      Set the crop tool to 5.5×7 inches at the top of the screen.
      Click and drag the crop tool until the area you want to crop is selected.
    2. Hit enter to crop your image.
      drake_bw_cropped
  6. Intensify your shadows & highlights.
    1. Image -> Adjustments -> Levels
      drake_levels
  7. Double click on the background layer in your layers palette and rename it.
    Then use the eraser tool to erase the background:
    drake_no_bg.png
  8. Simplify your image to 4-6 shades.
    1. Layer -> Duplicate Layer
    2. Filter -> Artistic -> Cutout
      drake_cut_paper
  9. Touch up your image so it looks smooth and has a solid color background.
    1. Layer -> Duplicate Layer.
    2. Use the eyedropper tool  to select a color, then use the brush tool brush_tool(with hardness set to 100%) to color over the image and smooth out any awkward spot:
      brush_tool_slider.png
      The { key will make your brush smaller, and the } key will make your brush larger. You can use the magnifying glass to zoom in on the image.
      drake_cut_paper_edited
  10. Save your file as both a Photoshop (.psd) and a jpg (.jpg).
  11. Upload your original image and your cutout image to your blog.
  12. Upload your Photoshop (.psd) file to your Google Drive

Today we will:

  • Download a high-res celebrity image to work with
  • Crop the image so it is 5.5×7 inches
  • Alter the image so it is a black and white image with 4-6 shades
  • Create a new blog post with the following:
    • The original celebrity image
    • Your cropped, monochromatic high-contrast celebrity portrait
    • A paragraph describing why you picked the celebrity, and which colors you plan to use for each part of the project.