Today’s essential question: How can I add text to my cereal box in Photopea?
Method 1: Using the Text Tool
- Click on the Text tool

- Press the mouse and drag it to draw a rectangle, then release the mouse.
After creating the new Type layer, you can start typing: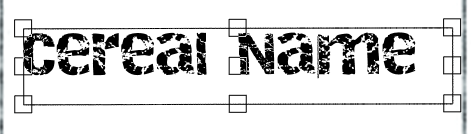
- You can change the font, size, color, and alignment using the type toolbar at the top of the screen:

Method 2: Importing Text as a Graphic (only use this for headings NOT body text)
- Go to dafont.com.
- Click on any font you are interested in, type the name of your cereal into the preview box, and take a screenshot.
- In Photopea, click File -> Open & Place
- Scale the image until it is the size you want it to be. Make sure you hold down the Shift key and scale your text from the corner so it doesn’t distort!
- Rasterize your layer (Layer -> Rasterize)
- Click and hold on the Object Selection Tool until the Magic Wand pops up:
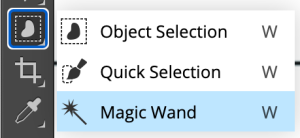
- Select the Magic Wand

- Click on one of the letters to select it. Hold down on the shift key and select the remaining letters.
- Change the color (if desired) by double clicking on the Color Swatch
 at the bottom left screen.
 - Select the Brush tool

- Paint your letters the desired color.
- Deselect the text. (Select -> Deselect)

